Life has been busy for me lately so I haven't had much time to keep up with the blog. We've got a big group brew coming up this weekend so I am building up some starters for people to use. In the process I've inadvertently done a little non-scientific experiment. A couple of my friends would like to brew with Whitbread ale yeast so I made up two 50 ml starters (about 1.040). I grabbed my Whitbread Ale plate and plucked 2 colonies of the plate, one for each starter. One batch went on my stir plate, the other sat on the counter.....48 hours later here are the results:

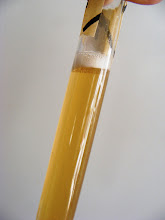
Notice the starter on the stir plate is nice and cloudy vs the counter top beaker which has a clear wort with only a small colony propagating on the bottom.
After removing the Erlenmeyer flask from the stir plate and allowing the yeast to settle the difference is quite noticeable. Look at the nice layer of yeast cells in the Erlenmeyer vs the small colony in the beaker.
I don't have a microscope at home to do yeast counts but there is visibly more yeast in my starter on the stir plate. I have a second stir plate I built sitting in the basement with a loose connection. I really need to get that one back in operation so I can run multiple stir plates at the same time.
One of the things that has been keeping me busy is brewing gadget product. I've begun to get interested in open fermentation and have been thinking about giving it a try. I've always thought Yorkshire Square ferementers were pretty cool and I decided to build my own mini (or perhaps nano) Yorkshire Square.

There is a large cache of old slate pavers at my parents house that used to make up a walk to their front door (about 20 years ago). These stones have been patiently waiting to be put to good use for quite some time now and conveniently are about the size I needed for this project. So 5 slabs of slate, an inexpensive tile saw purchased on Craig's List, some food grade silicone, and some scrap poplar that was lying around and before you know it I have a new 6.5 gal fermenter.
Weighing in over 50 pounds empty it may not be the most practical piece of brewing equipment but it sure is nice to look at. I have a starter of Burton Ale yeast brewing up to be used in my first batch in the fermenter. Given the number of small cracks and crevices in the stone I assume it will never be sanitized the way a glass carboy can. I am planning to pitch a very large starter to the first batch hoping to innoculate all these small places where microbes might hide. I've picked the Burton Ale yeast for it's flavor profile as well as its reputation as a good top cropper, a trait which seems important in an open fermentation. The wort for this first fermentation will be from a split batch with the other batches being closed. It should be interesting to see what sort of differences (if any) there are between fermenter types.
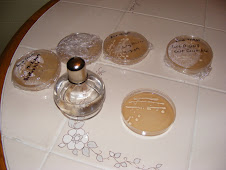
 Wow! I've been a little remiss in keeping this blog updated. Since my last post life has been rather busy. The good news is that my broken tube of Burton ale yeast plated out with consistent yeast colony growth with no evidence of contamination. I chose an isolate from the plate and made a new tube and have subsequently used it to brew up a nice ordinary bitter.
 In other news, the safari has now moved to Fairbanks, Alaska. It was a big move from Massachusetts to Alaska but the cultures all made it with flying colors. Not wanting to deal with crossing international borders with a collection of culture samples to explain I chose to ship them instead. I had a insulated shipper that all of my various cultures (including the various Saccharomyces cerevisiae, my sour dough culture, and a kombucha culture) packed nicely into with some ice packs. I dropped them off at the post-office and sent them off first class mail to some friends in Fairbanks. I was very pleased when I found out that everything arrived intact and alive.