Friday, September 25, 2009

EastCoast Ale Starter and new plates!


My EastCoast Ale starter is going strong!  I went from a 10 ml starter from a single colony to a 125 ml starter.  Yesterday I kicked it up to an 800 ml starter and it has really taken off.  I recently got a stirplate and this is my first chance to get to play with it.  I put both the 125 ml and the 800 ml starters onto the plate.  The 800 ml starter is happily spinning away.  I'm brewing my RedHead in 2 days so I think I should be in good shape.  I'm expecting that fermentation to take right off!


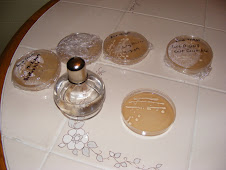
In other news.....I recently purchased some glass petri dishes!  Brand new at bio supply companies they can be kindof pricey but I found some on ebay at a great price.  I suspect they may not be as high of quality as I might purchase from FischerSci but I think they are going to do a great job for me.  My last batch of plates ended up with a lot of contamination.  Part of the problem was the hot and muggy weather we were having this summer and mold spores floating everywhere.  Since I poured my malt-agar into plastic plates I was only able to keep things sanitized and not sterilized.  With the new plates I mixed up the malt-agar solution and poured it into clean plates.  I then ran the poured plates through an autoclave at work.  For those of you without access to an autoclave a pressure cooker would work just fine.  So now I have a bunch of nice new sterile plates to work with.  My cultures are getting old and a few have picked up some contamination.  The nice thing about working with the plates is I can see contaminant colonies and pick up a nice healthy looking colony and re-isolate it on a new plate.

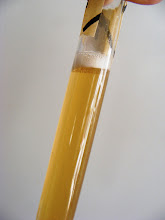
I made up a few slant tubes as well.  I figure plates work great for isolating colonies from a liquid culture but they do take up some room in the fridge, can become contaminated when opened, and can dry out.  Slant tubes address all of these problems.  Once you have a pure isolate they are a good way of storing the culture.  My Cry Havoc plate still looks in good shape and has some happy looking colonies.  I picked one up and inoculated a slant with it today, can't wait to see how it grows.

Monday, September 21, 2009

10 mls of love!


I plucked a colony of East Coast Ale yeast of my plate the other day and used it to innoculate10 mls of wort starter.  After 24 hours at room temp I was showing signs of fermentation and after 3 days there is very active fermentation!  Today I am stepping it up to 100 mls of wort.  After a couple of more days I hope to get it into my typical 700-800 ml starter.  By this coming weekend I should have tons of happy yeast at the ready for my brew day!

Wednesday, September 16, 2009

Oaking the Belgian IPA

I am trying my hand at oaking for the first time today.  I have my big IPA from the group brew aging in the secondary.  It already has a big difference in flavor and aroma from the last time I brewed it when I used the Cry Havoc yeast.  Last time around it was a great beer.  Since the point of this brew is to brew up a large batch and divide up the wort and have everyone ferment their portion differently I thought I would go for something very different.

The Belgian yeast strain has already given this beer a great aroma and flavor.  I got ahold of some American oak chips.  I would prefer to have some of the cubed french oak but the American chips were what was available.  This morning I tossed an ounce of the chips in the toaster and toasted them until they started smoking a little and started picking up color.  Boy did that smell great!  After they cooled down I soaked them in water all day.  This evening when I got home from work I thieved a sample out of the secondary for a taste test (yum!) and in went the oak chips!

I'm planning on sampling the beer every day or two and try to track the changes in flavor.  Once it gets where I want it I'll either send it off to the bottling line or rack it to another carboy to get it off the oak.  This one should really stand out from the crowd when everyone gets together for a tasting of this brew sometime next month!

Saturday, September 5, 2009

Thanks Basic Brewing Radio

Thanks so much to James of Basic Brewing Radio for having me on the podcast.  I've gotten a lot of brewing inspiration from BBR and I find it an invaluable resource.  I love exploring the different ingredients that go into beer.  I think one of the most underappreciated ingredients is yeast.  Certainly there's lots of hop heads out there and a decent number of people that love the malty goodness.  A lot of people even do some sort of water treatment such as adding Burton salts or filtering their water.  I've really begun to appreciate the subtleties that different yeast strains provide.  My interest has slowly been growing in this area over the last several years but really took off when my homebrew club did a group batch where we brewed up a large amount of a single wort and each fermented it differently.  It was amazing how different each beer was.  All the same elements were there in each beer but at the same time each beer was distinctly different.  Each strain of yeast had taken all those flavor elements and worked them in its own way as well as adding its own unique flavors.  We just repeated this experiment a few weeks ago with a new set of yeast and I can't wait to taste the results.

I'm learning a lot of this as I go and having a good time doing it!  I love watching those little yeast colonies grow up on the plate almost as much as I love growing them up to ferment a new batch of beer.  As I mentioned to James yeast ranching is pretty simple.  Basically you need an alcohol lamp and a wire loop that you can sterilize.  Pre-poured malt/agar plates are pretty cheap and available from homebrew sites such as morebeer.  With these you just need to flame your loop, pick up a yeast sample, and streak it onto the plate. With a pressure cooker or access to an autoclave you can mix up your own agar and pour out your own plates.

Thursday, September 3, 2009